Why LiteLLM Matters for AI Engineering Teams

My current team has been using multiple AI coding agents at work, and we wanted a simpler way to see what each one was actually costing us. Not just total spend, but the shape of the usage: prompt tokens, output tokens, and cached tokens when the provider exposes them.
That is what led us to try LiteLLM. For me, this is mostly a work tool right now, not a personal daily setup. In my own personal usage, I still mostly rely on subscriber / OAuth-style accounts in Codex and Claude, so LiteLLM has been more relevant where API-key based workflows and spend visibility matter directly.
LiteLLM acts as a gateway that sits between your coding tools and the model providers. In a team setup, that could be a shared cloud instance that everyone routes through. In our case, during this experimental phase, each of us has been running it locally with Docker on our own machines. Either way, the idea is the same: instead of pointing Codex or Claude Code directly at OpenAI or Anthropic, you point them at LiteLLM, and it becomes the place where you can route requests, create virtual keys, inspect logs, and track usage.
That sounds small, but it changes the experience quite a bit. You stop guessing. You stop thinking "Claude felt expensive this week" or "I think Codex is using more context than I expected" and start seeing actual request and spend data.
I also think it points to something bigger. This is the kind of tool that feels optional early on, and obvious later. As AI agents become a more normal part of software engineering, tools like this will matter more. Once teams depend on agents across editors, terminals, CI pipelines, and internal tools, they will want the same things they always want from infrastructure: visibility, routing, and some control over cost.
This article was fact-checked against the LiteLLM docs, the LiteLLM release notes, and the latest stable LiteLLM release, v1.98.0, published on August 22, 2026.
Why LiteLLM is useful
LiteLLM is best understood as an AI gateway / proxy with an OpenAI-compatible interface.
For local developer usage, that makes it useful for a few practical reasons:
- one endpoint in front of multiple providers
- one place to inspect spend and request logs
- virtual keys for different tools or workflows
- easier model comparison without reconfiguring everything every time
If you already read my post on reducing token consumption with Claude Code and Codex, this is the next layer up. That post is about habits. LiteLLM is about visibility.
Does this only work with API keys?
Not quite.
The cleanest local setup is still API-key based, and that is the path I would recommend for most developers because it is the simplest to reason about.
As of late August 2026, LiteLLM also documents Claude Code flows that route some login / subscription-based traffic through the gateway, including a Claude Code Max subscription guide.
So the better framing is:
- easiest path: API keys
- also supported: some Claude login / BYOK / subscription flows
- separate concern: where the provider bills the request vs where LiteLLM tracks it
That distinction is worth knowing, but I would still keep a first-time local setup simple and API-key driven.
The setup in short
If you want the full canonical guide, LiteLLM's own docs are the right source. A blog post does not need to be your installation manual, especially now that any decent AI coding agent can walk you through the mechanics in a few minutes.
What matters more here is the basic shape of the setup.
1. Start LiteLLM with Docker
LiteLLM has an official Docker quickstart:
curl -sSLO https://docs.litellm.ai/docker-compose.yml
docker compose up -d
If you plan to keep the setup around, pin the image tag instead of latest, and set a real LITELLM_SALT_KEY before storing provider credentials.
2. Open the UI and add a model
Once the stack is up:
- open
http://localhost:4000/ui - log in with the
LITELLM_MASTER_KEY - add one provider model
- test it in the Playground
That is enough to prove the gateway is working.
3. Create a virtual key
This is where LiteLLM starts becoming more useful than just "a proxy on localhost".
Create separate virtual keys for different tools, for example:
codex-localclaude-code-local
That makes it much easier to compare usage later.
4. Point Codex and Claude Code at LiteLLM
For Codex, LiteLLM documents a ~/.codex/config.toml setup that points the provider to LiteLLM and uses http://localhost:4000/v1 as the base URL.
For Claude Code, LiteLLM documents the same basic idea with:
export ANTHROPIC_BASE_URL="http://localhost:4000"
export ANTHROPIC_AUTH_TOKEN="sk-<your-litellm-virtual-key>"
That is really the whole flow: run LiteLLM, add a model, create a virtual key, and point your client at LiteLLM instead of the provider directly. The exact config shape will keep evolving, and if you are already using an AI agent, that agent can usually help you bridge the last mile from docs to working local config very quickly.
The pages worth checking
Once LiteLLM is up, the install is the least interesting part. The useful part is what you can actually learn from it.
I do not think you need screenshots of every page in the product, but two of them are worth seeing because they make the value proposition obvious very quickly.
Usage
This is the page I care about most.
It gives you a higher-level view of where requests and spend are going. If you gave Codex and Claude Code separate virtual keys, you can start comparing them instead of relying on intuition.
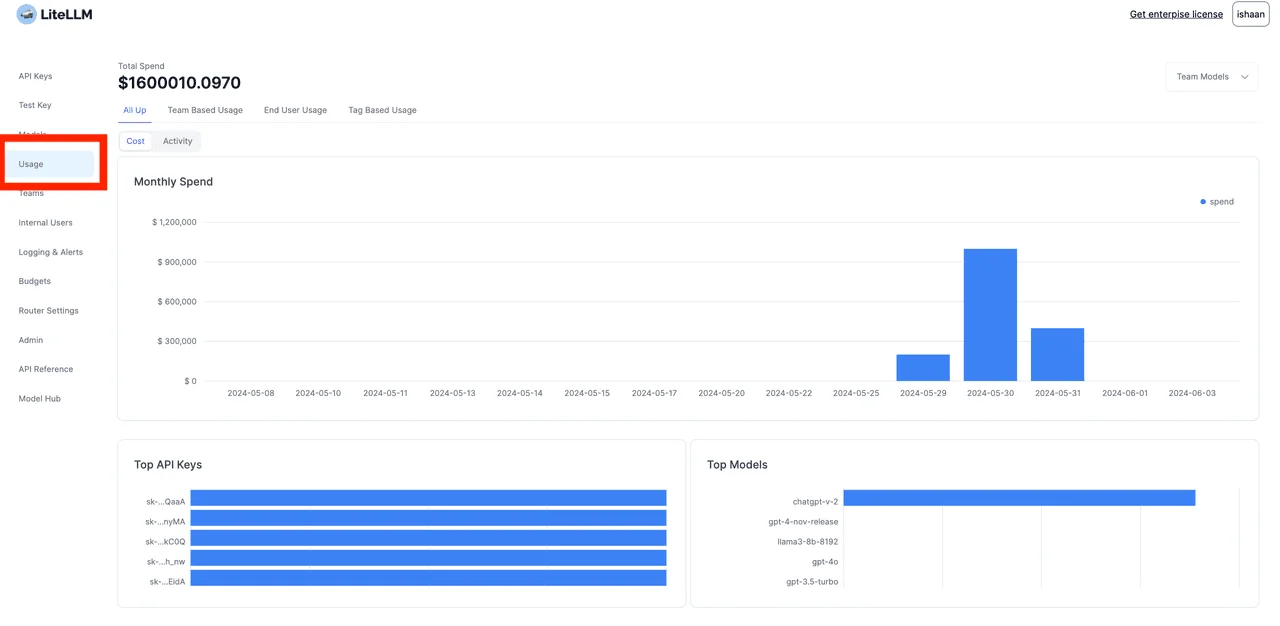
Source: LiteLLM Spend Tracking docs
Logs
This is the operational page.
If something fails, feels slow, or behaves strangely, the logs are where you confirm whether the request even reached the gateway and what LiteLLM saw when it did.
Virtual Keys
This page is underrated.
If everything shares one key, your data gets muddy. If you separate keys by tool or workflow, LiteLLM becomes much more useful as a comparison layer. One key for Codex, one for Claude Code, and one for embedded AI features in internal applications already gives you a much clearer picture of where tokens are actually going.
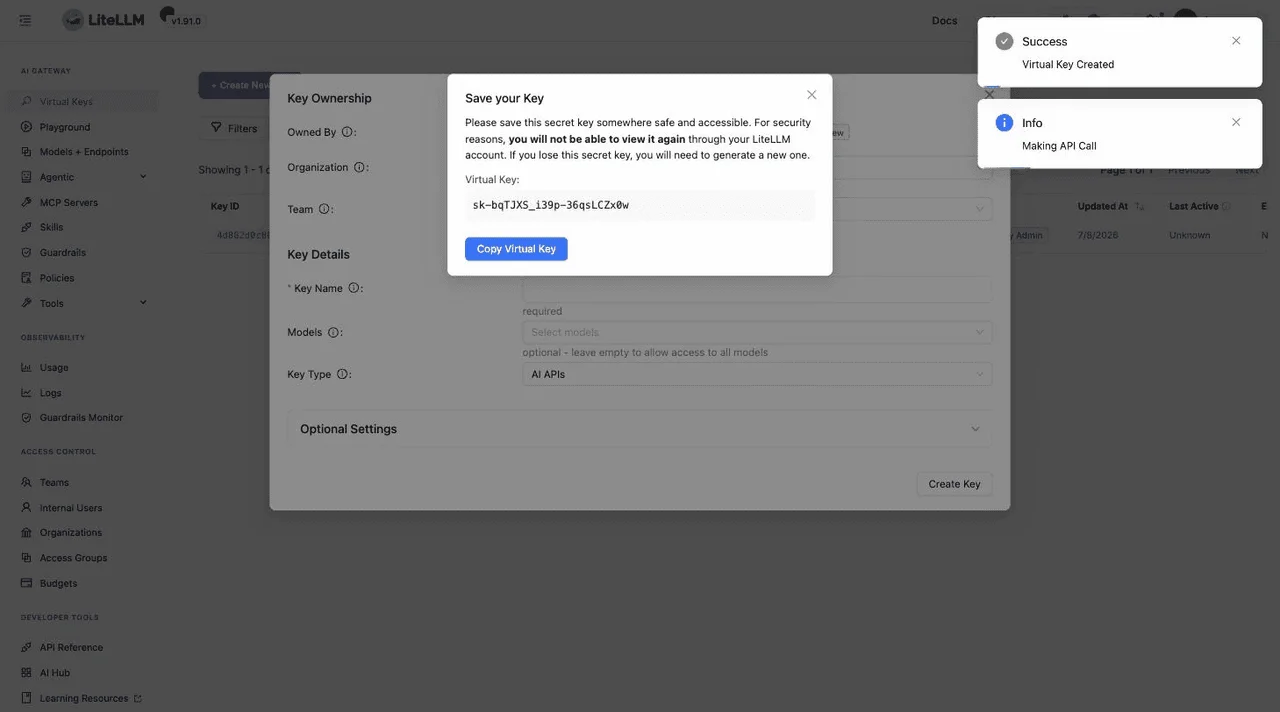
Source: LiteLLM Docker Quickstart docs
Models + Endpoints
This is the source of truth for what the gateway is actually exposing. If one of your tools says a model is missing or misnamed, this is one of the first places to check.
Why this category matters
One thing I keep noticing with AI tooling is that the model itself is only part of the story now.
An ecosystem is forming around it:
- gateways
- cost dashboards
- request logs
- routing layers
- policy and budget controls
That is normal. Every platform that becomes expensive or operationally important grows a tooling layer around cost, control, and visibility.
In practice, I think that means a few things. Teams will want shared gateways instead of every engineer wiring tools directly to every provider. They will want to compare models without rewriting integrations every time. And they will want some way to audit where spend is going once AI agents start showing up not just in editors, but in CI pipelines, internal tools, and product features too.
That is why I like LiteLLM. It is open source, practical, and useful even at the single-developer level. You do not need to be a platform team to benefit from knowing where your AI spend is going.
And even if an AI agent can help you install it in minutes, it is still worth understanding why you would want it in the first place.